OpenCV3.4.2で始める浅いディープラーニング (その3 物体検出)
example_dnn_object_detectionは、画像中の物体の矩形領域を見つけてラベル付けした答えを返してくれる物体検出プログラムです。opencv/samples/dnn at master · opencv/opencv · GitHubのModel Zooに挙げられているモデルが使えます。
モデル名と使用するパラメータはModelZooに掛かれているのですが、具体的なモデルファイル名が書かれていません。対応があっているかどうか若干不安がありますが、それぞれ試してみたいと思います。
1. example_dnn_object_detection
MobileNet-SSD, Caffe
example_dnn_object_detection.exe --model=MobileNetSSD_deploy.caffemodel --config=MobileNetSSD_deploy.prototxt --scale=0.00784 --width=300 --height=300 --mean=127.5 127.5 127.5 --classes=object_detection_classes_pascal_voc.txt --input=dog416.png
OpenCV face detector
example_dnn_object_detection.exe --model=opencv_face_detector.caffemodel --config=opencv_face_detector.prototxt --scale=1.0 --width=300 --height=300 --mean=104 177 123 --classes=object_detection_classes_coco.txt --input=googlenet_1.png
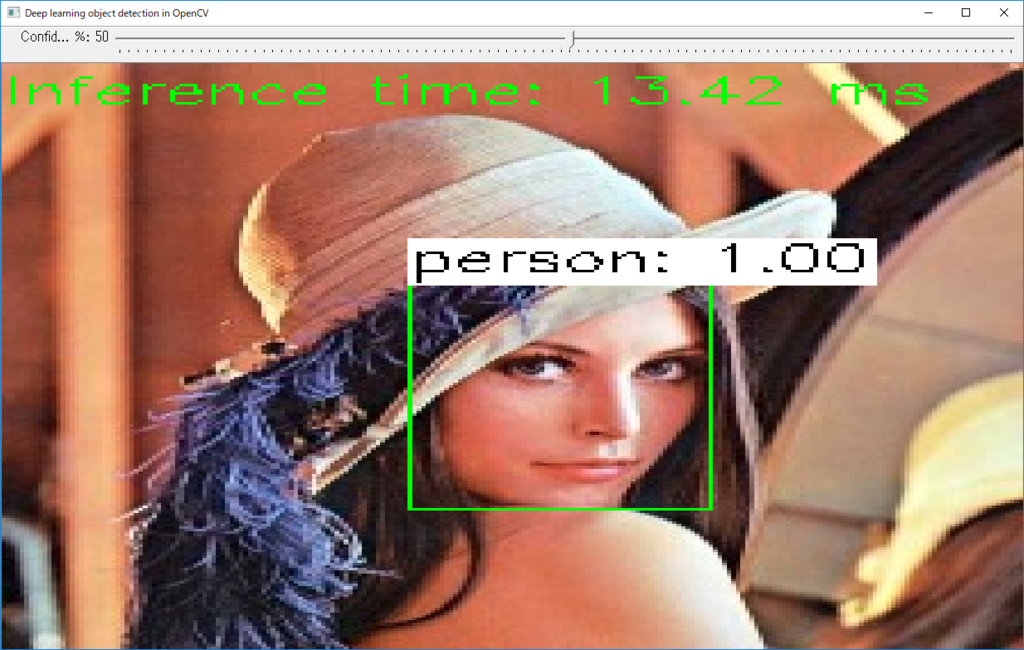
SSDs from TensorFlow
example_dnn_object_detection.exe --model=ssd_inception_v2_coco_2017_11_17.pb --config=ssd_inception_v2_coco_2017_11_17.pbtxt --scale=0.00784 --width=300 --height=300 --mean=127.5 127.5 127.5 --rgb=1 --classes=object_detection_classes_coco.txt --input=dog416.png --backend=3
example_dnn_object_detection.exe --model=ssd_mobilenet_v1_coco_2017_11_17.pb --config=ssd_mobilenet_v1_coco_2017_11_17.pbtxt --scale=0.00784 --width=300 --height=300 --mean=127.5 127.5 127.5 --rgb=1 --classes=object_detection_classes_coco.txt --input=dog416.png --backend=3
YOLO
example_dnn_object_detection.exe --model=yolov3.weights --config=yolov3.cfg --scale=0.00392 --width=416 --height=416 --mean=0 0 0 --rgb --classes=object_detection_classes_yolov3.txt --input=dog416.png
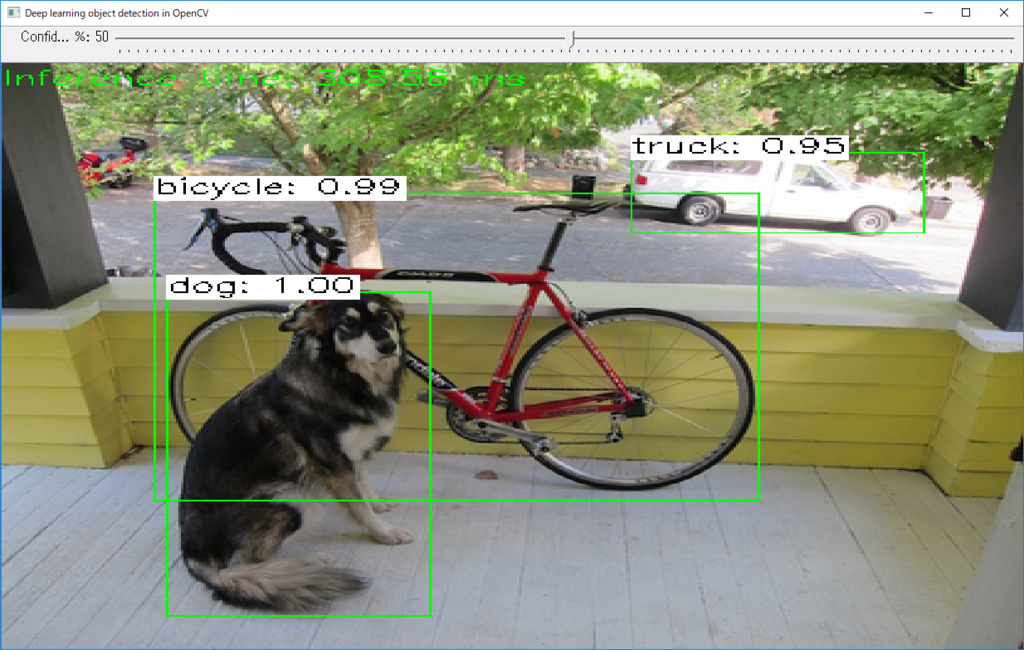
VGG16-SSD
example_dnn_object_detection.exe --model=VGG_ILSVRC2016_SSD_300x300_iter_440000.caffemodel --config=ssd_vgg16.prototxt --scale=1.0 --width=300 --height=300 --mean=104 117 123 --input=dog416.png
Faster-RCNN
example_dnn_object_detection.exe --model=VGG16_faster_rcnn_final.caffemodel --config=faster_rcnn_vgg16.prototxt --scale=1.0 --width=800 --height=600 --mean=102.9801 115.9465 122.7717 --classes=object_detection_classes_pascal_voc.txt --input=dog416.png
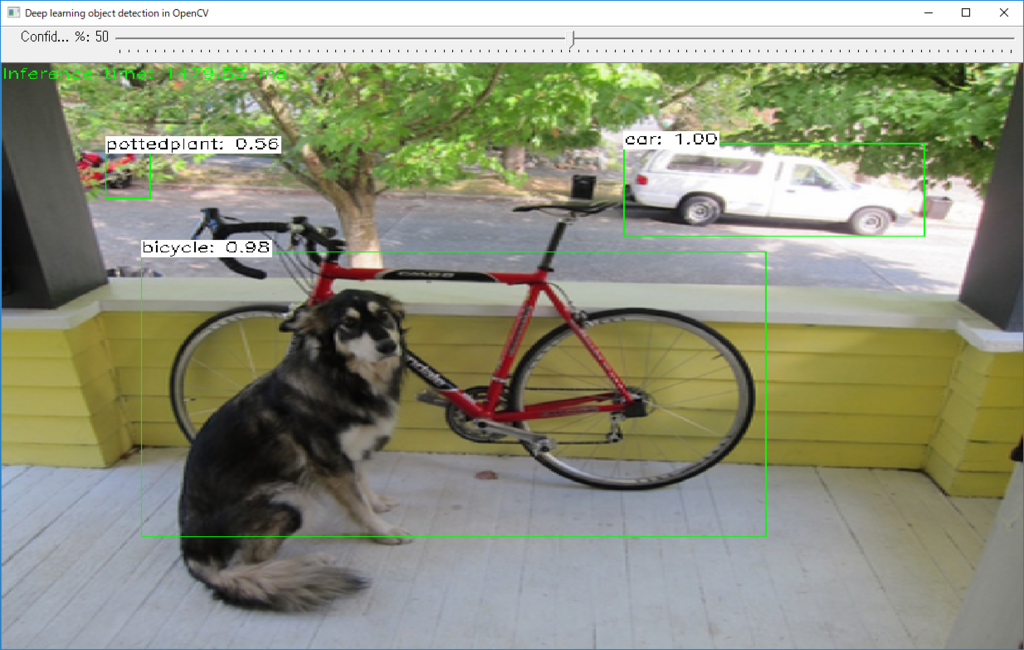
example_dnn_object_detection.exe --model=ZF_faster_rcnn_final.caffemodel --config=faster_rcnn_zf.prototxt --scale=1.0 --width=800 --height=600 --mean=102.9801 115.9465 122.7717 --classes=object_detection_classes_pascal_voc.txt --input=dog416.png
違いが良く分からない。
R-FCN
example_dnn_object_detection.exe --model=resnet50_rfcn_final.caffemodel --config=rfcn_pascal_voc_resnet50.prototxt --scale=1.0 --width=800 --height=600 --mean=102.9801 115.9465 122.7717 --classes=object_detection_classes_pascal_voc.txt --input=dog416.png
???? これと、この下の対応モデルが良く分からない。
Faster-RCNN, ResNet backbone
example_dnn_object_detection.exe --model=resnet50_rfcn_final.caffemodel --config=rfcn_pascal_voc_resnet50.prototxt --scale=1.0 --width=300 --height=300 --mean=103.939 116.779 123.68 --rgb=1 --classes=object_detection_classes_pascal_voc.txt --input=dog416.png
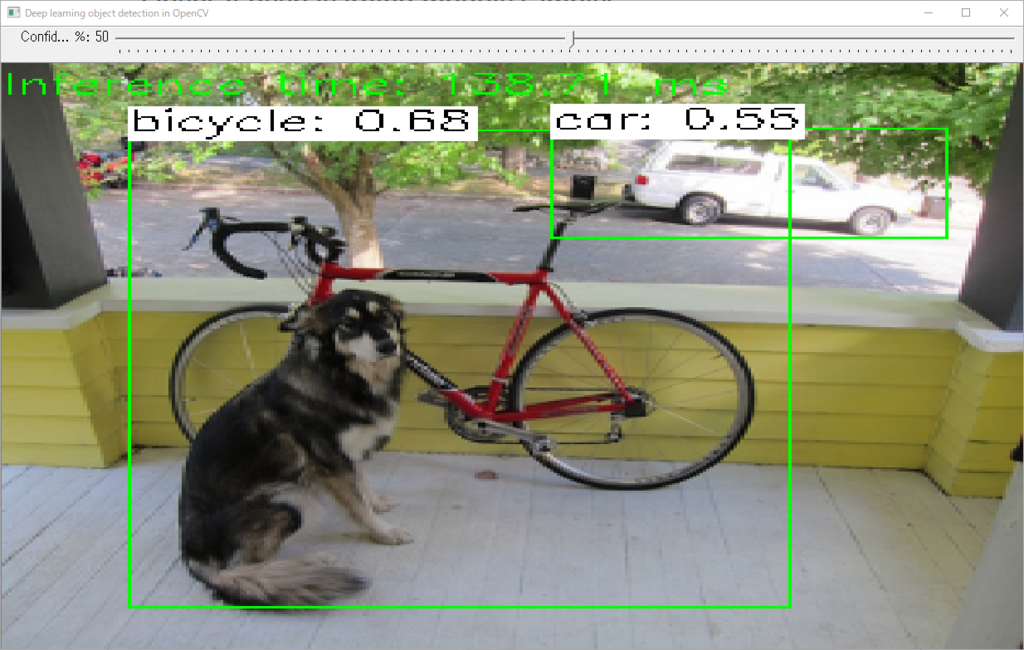
????
Faster-RCNN, InceptionV2 backbone
example_dnn_object_detection.exe --model=faster_rcnn_inception_v2_coco_2018_01_28.pb --config=faster_rcnn_inception_v2_coco_2018_01_28.pbtxt --scale=0.00784 --width=300 --height=300 --mean=127.5 127.5 127.5 --rgb=1 --classes=object_detection_classes_coco.txt --input=dog416.png --backend=3
OpenCV3.4.2で始める浅いディープラーニング (その8 遅いのでOpenVINO有効化)
前回、OpenCV-dnnのHalideはまだ早すぎたんだ、ということが分かりました。今回は、手間を掛けずに高速化できそうなもう一方の手段OpenVINOを試してみたいと思います。基本的にはIntelCPU限定で使うことができます。
準備
事前にPython3.5以降とIntelGPUの有効化をしておく必要があります。
64ビット版python3.5以降のインストール
Python3.7が最新版です。3.7でも多分問題ないですが、安定志向の人はPython3.5もしくはPython3.6シリーズのどれか好きなのをインストールしてください。必ず64ビット版を選んでください。
www.python.org
Python2.7等もインストールしている人は、Pathに注意してください。cmdプロンプトでpythonと打った時、Python3.5~が呼ばれていることを確認しておいてください。
パスの例:
C:\Users\cvl\AppData\Local\Programs\Python\Python36
C:\Users\cvl\AppData\Local\Programs\Python\Python36\Scripts
今回の記事では特にいらないけれど、モデルのダウンロード等に使うpythonライブラリのダウンロードしておくと便利。
> pip install pyyaml
> pip install requests
ダウンロード
IntelのWebサイトで個人情報を登録の上、ダウンロードしてください。商用にも使える緩いライセンスだそうですが、気になる人はライセンス規定も調べておいてください。
software.seek.intel.com
ダウンロード完了後、ダイアログに従ってインストールを進めてください。規定ではc:\Intel\computer_vision_sdk_2018.2.304などにインストールされます。後ろの数字は、バージョン番号です。
OpenCVのリビルド
OpenVINOのインストール完了後、OpenCVのビルドをCMakeからやり直す必要があります。CMakeは2回に分けてConfigureします。
- 1回目
WITH_INF_ENGINE check
- 2回目
INF_ENGINE_INCLUDE_DIRS C:/Intel/computer_vision_sdk_2018.2.304/inference_engine/include 勝手に入っているはず
INF_ENGINE_ROOT_DIR C:/Intel/computer_vision_sdk_2018.2.304/inference_engine 勝手に入っているはず
inference_engine C:/Intel/computer_vision_sdk_2018.2.304/deployment_tools/inference_engine/lib/intel64/Release/inference_engine.lib 入れる
Configureを通して、Generateして、OpenCVをリビルドしてください。リビルド完了後、dllファイルおよびdnn関連のexeファイルをopencv_extra/testdata/dnnに上書きコピーしてください。inference_engineのdllのコピーは必要ありません。ライブラリのインストール時にパスが通されています。
(dllをコピーするのは、今の作業はテストのつもりなので環境にコンフリクトが起こさないように配慮しているためで、もちろんdllをコピーする代わりにパスをちゃんと通しても構いません。)
実行テスト
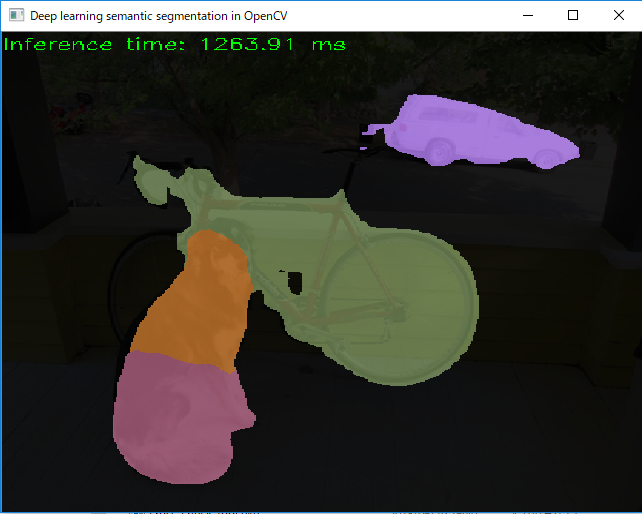
inference_engineを使って実行。1263.91ms
example_dnn_segmentation.exe --model=fcn8s-heavy-pascal.caffemodel --config=fcn8s-heavy-pascal.prototxt --scale=1.0 --width=500 --height=500 --mean=0 0 0 --classes=segmentation_classes_pascal_voc.txt --backend=2 --input=dog416.png
Halideを使って実行。5827.15ms

OpenCV(CPU)を使って実行。2897.94ms
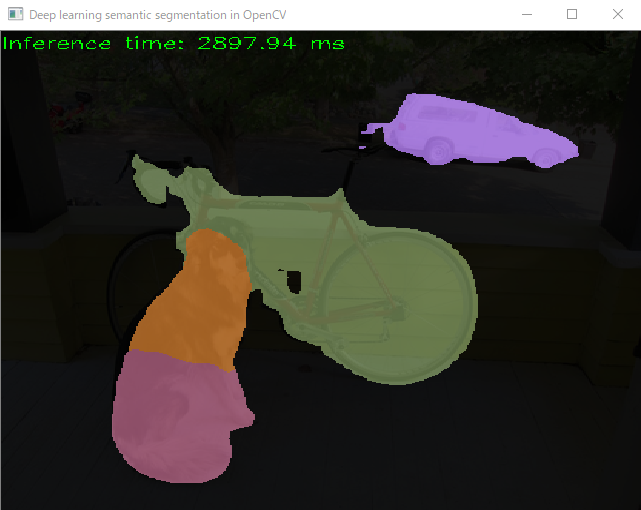
おお、これは効果がありましたね!CPU(Core i7-4770S)に比べて2倍程速くなっています。んー、ほんとかなぁ。
OpenCV3.4.2で始める浅いディープラーニング (その7 遅いのでHalide有効化)
テストプログラムを実行してみましたが、実行速度が遅いという不満があります。テストプログラムの引数のいくつかに、使ってこなかったものの気になるパラメータがありました。backendと、targetです。
- backend (value:0)
Choose one of computation backends:
0: automatically (by default),
1: Halide language (http://halide-lang.org/),
2: Intel's Deep Learning Inference Engine (https://software.intel.com/openvino-toolkit),
3: OpenCV implementation
- target (value:0)
Choose one of target computation devices:
0: CPU target (by default),
1: OpenCL,
2: OpenCL fp16 (half-float precision),
3: VPU
backendの選択肢にあるHalideやIntel's Deep Learning Interface Engineは、環境ごとに利用可能なSSEやAVX等の並列計算機能を自動的に有効化して、環境の違いを吸収しつつ高速化されたコードを出力してくれるライブラリです。上手くいけば2~20倍ほどの高速化が期待できるようです。
Halideについては、福嶋先生のまとめ記事がとても分かり易いです。
qiita.com
これを有効化すれば、速くなりそうです。Halideを有効化してみましょう。
1. Halideの有効化
Halideの導入については、OpenCVのTutorialの中に丁寧な説明があります。
OpenCV: How to enable Halide backend for improve efficiency
の3つの手順を踏みます。
チュートリアルに従ってやってみるとエラーが出る
チュートリアルのリンクを使って素直にダウンロードしたLLVM4.0とclang4.0を使ってHalideをビルドしようとすると、rrors: too many arguments to function ‘llvm::ModulePass* llvm::createAddressSanitizerModulePass()なるエラーが出てきて上手くビルドできません。Halideの現在のソースコードにうまく合わないようです。
LLVMとClangの最新バージョン6.0.1を使ってみる。
http://releases.llvm.org/download.html#6.0.1
から,LLVMとClangのソースコードをダウンロードしてきて試してみます。圧縮ファイルはxzというちょっと珍しい拡張子になっています。Windows環境での解凍にはLhaforge等が便利です。
例としてはこんな感じ。
LLVMをc:\workspace等に解凍します。解凍した中に入ってc:\workspace\llvm-6.0.1.src\toolsでclangのxzを解凍し、解凍してできたフォルダの名前をclangに変更します。
次に必ず、MSVCの開発者コマンドプロンプトを開いて、そこでcmakeとbuildを実行します。
cd c:\workspace\llvm-6.0.1.src
mkdir build
mkdir install
cd build
cmake.exe -DLLVM_ENABLE_TERMINFO=OFF -DLLVM_TARGETS_TO_BUILD=X86 -DLLVM_ENABLE_ASSERTIONS=ON -DCMAKE_BUILD_TYPE=Release -DCMAKE_INSTALL_PREFIX=c:\\workspace\\llvm-6.0.1.src\\install -G "Visual Studio 14 Win64" c:\\workspace\\llvm-6.0.1.src
MSBuild.exe /m:4 /t:Build /p:Configuration=Release .\\INSTALL.vcxproj
HalideはTutorialに指示されたダウンロード先のGithubからmaster版のソースコードを持ってきます。
c:\workspace\Halide等に解凍して、LLVMと同じように開発者コマンドプロンプトにて次のような手順でビルドします。
cd c:\workspace\Halide
mkdir build
cd build
cmake.exe -DLLVM_DIR=c:\\workspace\\llvm-6.0.1.src\\install\\lib\\cmake\\llvm -DLLVM_VERSION=60 -DWITH_TESTS=OFF -DWITH_APPS=OFF -DWITH_TUTORIALS=OFF -DCMAKE_BUILD_TYPE=Release -G "Visual Studio 14 Win64" ..
MSBuild.exe /m:4 /t:Build /p:Configuration=Release .\\ALL_BUILD.vcxproj
ここまで準備ができたら、最後にOpenCVのビルドをCMakeからHalide関連のオプションを有効にしつつ、やり直します。
(ENABLE_CXX11 [check])
WITH_HALIDE [check]
HALIDE_ROOT_DIR c:\\workspace\Halide\build
再ビルドしてできたdllファイルとexeファイルをopencv_extra/testdata/dnnの古いファイルに上書きコピーします。また、Halide.dllを同じフォルダにコピーします。
Halideを有効化して、exampleを動かしてみる
backendにHalideを指定してsegmentationを動かしてみます。実行環境は、Intel Core i7-4770SでGeForce GTX760です。
example_dnn_segmentation.exe --model=fcn8s-heavy-pascal.caffemodel --config=fcn8s-heavy-pascal.prototxt --scale=1.0 --width=500 --height=500 --mean=0 0 0 --classes=segmentation_classes_pascal_voc.txt --backend=1
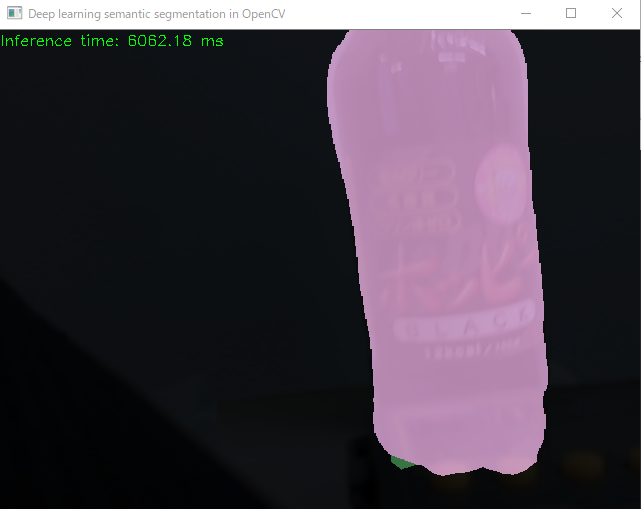
ふむふむ、実行周期約6秒と。あれ、遅くない???
ためしにautomaticallyに戻してみると、
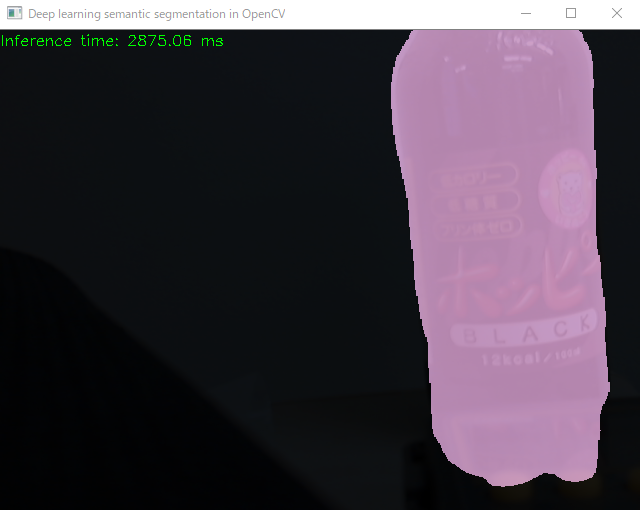
3秒を切ると。約2倍ほど速いですね。
ということで、何が原因かよくわかっていませんが、”Halideを有効化すると2倍以上遅くなる”という結果になりました。どの環境でも速くなるというわけではないようですね。もうちょっと試してみたいと思います。
(追記)Core i7-6700HQ, GeForce GTX1060環境でも試してみましたが、状況は変わらず(むしろ悪化)でした。
2018年7月23日現在の結論
答えはここにありました。ENetを除く大半のケースでまだCPUの方が速いようです。簡単に使わせてもらうには、OpenCV-dnnのHalideはまだ時期尚早のようですね。
stackoverflow.com
と
github.com
GPUを利用したOpenCLを使った場合よりも、CPU単体で実行したほうが速いということにも留意すべきかもしれません。また今のところ、Intel製グラフィックスチップのOpenCLしか実行できません(GeForceとかRadeonとかじゃ動かない)。
試すなら、Intel MKL(後継に当たる?OpenVINO™ Toolkit | Intel® Software)のようですね。ただし、最新のCPU(Core i7-6000シリーズ以降)でないと動かないようですので、これも敷居が高そうです。
OpenCV3.4.2で始める浅いディープラーニング (その4 セマンティックセグメンテーション)
2.example_dnn_segmentation.exe
意味づけ領域塗分け
Use this script to run classification deep learning networks using OpenCV.
Usage: example_dnn_classification.exe [params]--backend (value:0)
Choose one of computation backends: 0: automatically (by default), 1: Halide language (http://halide-lang.org/), 2: Intel's Deep Learning Inference Engine (https://software.intel.com/openvino-toolkit), 3: OpenCV implementation
-c, --config
Path to a text file of model contains network configuration. It could be a file with extensions .prototxt (Caffe), .pbtxt (TensorFlow), .cfg (Darknet)
--classes
Optional path to a text file with names of classes.
-f, --framework
Optional name of an origin framework of the model. Detect it automatically if it does not set.
-h, --help
Print help message.
--height
Preprocess input image by resizing to a specific height.
-i, --input
Path to input image or video file. Skip this argument to capture frames from a camera.
-m, --model
Path to a binary file of model contains trained weights. It could be a file with extensions .caffemodel (Caffe), .pb (TensorFlow), .t7 or .net (Torch), .weights (Darknet)
--mean
Preprocess input image by subtracting mean values. Mean values should be in BGR order and delimited by spaces.
--rgb
Indicate that model works with RGB input images instead BGR ones.
--scale (value:1)
Preprocess input image by multiplying on a scale factor.
--target (value:0)
Choose one of target computation devices: 0: CPU target (by default), 1: OpenCL, 2: OpenCL fp16 (half-float precision), 3: VPU
--width
Preprocess input image by resizing to a specific width.
実行例
ENet
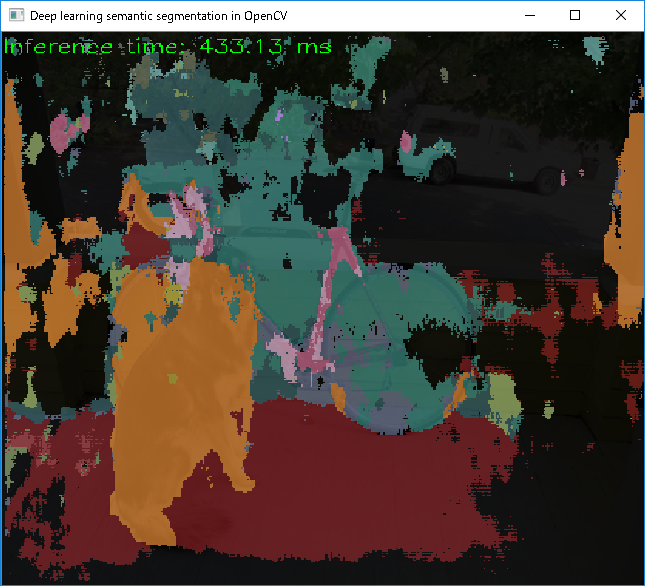
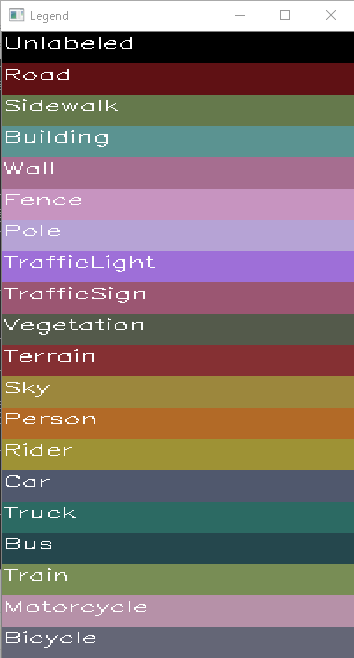
Enet-model-best.netというファイルはあるのだけれど、使い方が分からない・・・。
example_dnn_segmentation.exe --scale=0.00392 --width=1024 --height=512 --mean=0 0 0 --rbg --model=Enet-model-best.net --input=dog416.png --classes=enet-classes.txt
FCN8s
example_dnn_segmentation.exe --model=fcn8s-heavy-pascal.caffemodel --config=fcn8s-heavy-pascal.prototxt --scale=1.0 --width=500 --height=500 --mean=0 0 0 --input=dog416.png
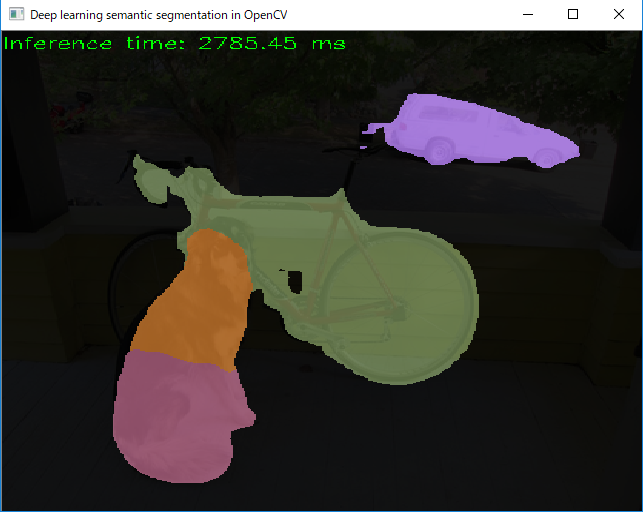
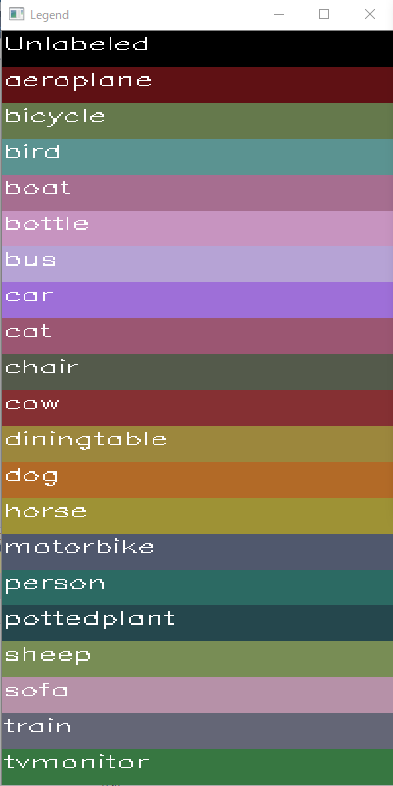
classesに与える適切なファイルが分からない。色分けは21色でされるのに、おそらく対応するラベルファイルのobject_detection_classes_pascal_voc.txtの登録数が20なので数が合わないとして無視される。仕方ないので、segmentation_classes_pascal_voc.txtをobject_detection_pascal_voc.txtのコピーとして作って、頭に一行「Unlabeled」を足す。
example_dnn_segmentation.exe --model=fcn8s-heavy-pascal.caffemodel --config=fcn8s-heavy-pascal.prototxt --scale=1.0 --width=500 --height=500 --mean=0 0 0 --input=dog416.png --classes=segmentation_classes_pascal_voc.txt
OpenCV3.4.2で始める浅いディープラーニング (その5 クラス分類)
(編集中)
3.example_dnn_classification
物体のクラス分類
Use this script to run classification deep learning networks using OpenCV.
Usage: example_dnn_classification.exe [params]--backend (value:0)
Choose one of computation backends: 0: automatically (by default), 1: Halide language (http://halide-lang.org/), 2: Intel's Deep Learning Inference Engine (https://software.intel.com/openvino-toolkit), 3: OpenCV implementation
-c, --config
Path to a text file of model contains network configuration. It could be a file with extensions .prototxt (Caffe), .pbtxt (TensorFlow), .cfg (Darknet)
--classes
Optional path to a text file with names of classes.
-f, --framework
Optional name of an origin framework of the model. Detect it automatically if it does not set.
-h, --help
Print help message.
--height
Preprocess input image by resizing to a specific height.
-i, --input
Path to input image or video file. Skip this argument to capture frames from a camera.
-m, --model
Path to a binary file of model contains trained weights. It could be a file with extensions .caffemodel (Caffe), .pb (TensorFlow), .t7 or .net (Torch), .weights (Darknet)
--mean
Preprocess input image by subtracting mean values. Mean values should be in BGR order and delimited by spaces.
--rgb
Indicate that model works with RGB input images instead BGR ones.
--scale (value:1)
Preprocess input image by multiplying on a scale factor.
--target (value:0)
Choose one of target computation devices: 0: CPU target (by default), 1: OpenCL, 2: OpenCL fp16 (half-float precision), 3: VPU
--width
Preprocess input image by resizing to a specific width.
実行例
GoogLeNet
example_dnn_classification.exe --model=bvlc_googlenet.caffemodel --config=bvlc_googlenet.prototxt --scale=1.0 --width=224 --height=224 --mean=104 117 123 --classes=classification_classes_ILSVRC2012.txt

SqueezeNet
example_dnn_classification.exe --model=squeezenet_v1.1.caffemodel --config=squeezenet_v1.1.prototxt --scale=1.0 --width=227 --height=227 --mean=0 0 0 --classes=classification_classes_ILSVRC2012.txt
今日のOffice付きノートPC
他社のPCに比べて、Officeの値段分だけ安い印象。プライムセールで買うと少し安かった。マイクロソフトのハードウェアは素晴らしい、ハードウェアは。
OpenCV3.4.2で始める浅いディープラーニング (その6 その他のexample)
(編集中)
順番がいきなり(その6)になってますが、気にしないでください。
その他のexampleの実行方法を確認していきます。
4.example_dnn_openpose.exe
人体の骨格認識をしてくれます。入力は2次元画像で、出力も2次元です。
A sample app to demonstrate human or hand pose detection with a pretrained OpenPose dnn.
Usage: example_dnn_openpose.exe [params]-h, --help (value:false)
print this help message
--height (value:368)
Preprocess input image by resizing to a specific height.
-i, --image
(required) path to image file (containing a single person, or hand)
-m, --model
(required) model weights, e.g. hand/pose_iter_102000.caffemodel
-p, --proto
(required) model configuration, e.g. hand/pose.prototxt
-t, --threshold (value:0.1)
threshold or confidence value for the heatmap
--width (value:368)
Preprocess input image by resizing to a specific width.
実行例
example_dnn_openpose.exe --model=openpose_pose_coco.caffemodel --proto=openpose_pose_coco.prototxt --image=googlenet_0.png

5.example_dnn_colorization.exe
グレースケールの画像の自動色付け。
This sample demonstrates recoloring grayscale images with dnn.
This program is based on:
http://richzhang.github.io/colorization
https://github.com/richzhang/colorization
Download caffemodel and prototxt files:
http://eecs.berkeley.edu/~rich.zhang/projects/2016_colorization/files/demo_v2/colorization_release_v2.caffemodel
https://raw.githubusercontent.com/richzhang/colorization/master/colorization/models/colorization_deploy_v2.prototxtUsage: example_dnn_colorization.exe [params]
-h, --help (value:true)
print this help message
--image (value:space_shuttle.jpg)
path to image file
--model (value:colorization_release_v2.caffemodel)
model weights
--opencl
enable OpenCL
--proto (value:colorization_deploy_v2.prototxt)
model configuration
実行例
example_dnn_colorization.exe

6.example_dnn_text_detection.exe
文字検出。日本語も。
Use this script to run TensorFlow implementation (https://github.com/argman/EAST) of EAST: An Efficient and Accurate Scene Text Detector (https://arxiv.org/abs/1704.03155v2)
Usage: example_dnn_text_detection.exe [params]-h, --help
Print help message.
--height (value:320)
Preprocess input image by resizing to a specific height. It should be multiple by 32.
-i, --input
Path to input image or video file. Skip this argument to capture frames from a camera.
-m, --model
Path to a binary .pb file contains trained network.
--nms (value:0.4)
Non-maximum suppression threshold.
--thr (value:0.5)
Confidence threshold.
--width (value:320)
Preprocess input image by resizing to a specific width. It should be multiple by 32.
実行例
example_dnn_text_detection.exe --model=frozen_east_text_detection.pb

今日の本文
Jazzを爆音で聴きたくなる。石塚先生の漫画にはハズレが無い!

BLUE GIANT SUPREME(1) (ビッグコミックススペシャル)
- 作者: 石塚真一
- 出版社/メーカー: 小学館
- 発売日: 2017/03/24
- メディア: Kindle版
- この商品を含むブログ (2件) を見る
OpenCV3.4.2で始める浅いディープラーニング (その1 インストールからexample_dnn_object_detection.exeを動かすまで)
最近はDeep Learningを使うと、オシャレなんだそうです。でも面倒くさい勉強は極力したくありません。OpenCVのdnnモジュールが、3.4.2ぐらいからレギュラー扱いで本体に吸収されたそうなので、お手軽にこれを使ってみたいと思います。
1.インストール
OpenCV3.4.2以降のソースコードを用意します。ここではgithubに上がっているmaster版[1]を使おうと思います。開発環境は、Windows10のMSVC2015です。[1]-[3]の3つをダウンロードして、例えばc:\workspaceなどに同じフォルダに並べて置きます。
1.1 ダウンロード
github.com
GitHub - opencv/opencv_extra: OpenCV extra data
GitHub - opencv/opencv_contrib: Repository for OpenCV's extra modules
1.2 cmakeとビルド
CMakeを普通に通してビルドします。CMakeの設定の例は次の通りです。
Where is the source code: c:\workspace\opencv\sources
Where to build the binaries: c:\workspace\opencv\build
1.2.1 [OpenCV 3.4.2限定] object_detection.cppのnmsを直す
zipファイルで配布されているopenCV3.4.2のsampleのソースコードには、なんかしょうもないタイポがありますので、これを直します。
c:\opencv342\sources\samples\dnn\object_detection.cppの25行目const char* keys の設定の中でthrとなっているのをnmsにします。
"{ thr | .4 | Non-maximum suppression threshold. }"
"{ nms | .4 | Non-maximum suppression threshold. }"
1.3 必要なファイルを準備
1.3.1 実行ファイルのコピー
buildした結果のexeファイルやdllファイルを、データファイルがあるopencv_extraフォルダの中にコピーして放り込みます。
- example_dnn_text_detection.exe
- example_dnn_segmentation.exe
- example_dnn_openpose.exe
- example_dnn_object_detection.exe
- example_dnn_colorization.exe
- example_dnn_classification.exe
と、
を
c:\workspace\opencv_extra\dnn
にコピーします。
1.4 何も分からないまま、dnnの物体検出をテスト
コマンドプロンプトを開いて、次のスクリプトを実行するか、txtエディタでobject_detection.bat等の適当な名前でバッチファイルを作ります。
PCに適当なUSBカメラをつないでおいてください。
example_dnn_object_detection.exe --model=yolov3.weights --config=yolov3.cfg --scale=0.00392 --width=416 --height=416 --mean=0 0 0 --rgb --classes=object_detection_classes_yolov3.txt
USBカメラが無い場合は、適当な画像ファイルを入力に指定してください。
--input=source.jpg
scaleやwidthやheightやmeanなどの謎パラメータはmodel毎に異なるそうなので、[4]を参考に使いたいモデルに合わせて調整してください。パラメータの簡単な説明は[5]の中のYOLO DNNsにありますが、プログラム実行ファイルが表示してくれるhelpを見た方が分かり易いです。
実行結果はこんな感じ。Intel Core i7-4770SのCPU実行で1fpsぐらいの速度です。

confidenceは、認識結果の確信度の閾値で50%以上の自信がある結果だけを表示します。
なんか知らんけど、机の前に座ってる特定のpersonだけ認識結果が悪い。。。
用語が分からない
dnn関係の説明で、CaffeとかCOCOとかYoloとかRNNとかResNetとか良く分からない単語がいっぱい出てきます。次から次へと新しい言葉が出てきて、何のことだかすぐわからなくなっちゃうので、次回はこれを整理したいと思います。(慣れている人なら、[6]を見れば直ぐに分かります)
参考文献
[1] OpenCV : github master
GitHub - opencv/opencv: Open Source Computer Vision Library
[2] opencv_extra
GitHub - opencv/opencv_extra: OpenCV extra data
[3] opencv_contrib
GitHub - opencv/opencv_contrib: Repository for OpenCV's extra modules
[4] OpenCV deep learning module samples
opencv/samples/dnn at master · opencv/opencv · GitHub
[5] OpenCV Tutorials : Deep Neural Networks (dnn module)
OpenCV: Deep Neural Networks (dnn module)
[6] Deep Learning in OpenCV
Deep Learning in OpenCV · opencv/opencv Wiki · GitHub
今日の英語
英語が全然分からないので、勉強しなおしています。この本が短くて明瞭でとても良かった!
あとは、覚えるだけ!(夏の終わりか、テスト前)

サバイバル英文法 「読み解く力」を呼び覚ます (NHK出版新書)
- 作者: 関正生
- 出版社/メーカー: NHK出版
- 発売日: 2015/10/09
- メディア: 新書
- この商品を含むブログ (1件) を見る

![マイクロソフト Surface Laptop [サーフェス ラップトップ ノートパソコン]プラチナ DAG-00106 マイクロソフト Surface Laptop [サーフェス ラップトップ ノートパソコン]プラチナ DAG-00106](https://images-fe.ssl-images-amazon.com/images/I/41-g22Y1DQL._SL160_.jpg)